

Imaginative Spaces (Project 1 The Distorting Lens)
Exercise 2.1 Zoom
Find a scene that has depth. From a fixed position, take a sequence of five or six shots at different focal lengths without changing your viewpoint.
")
")
")
")
")
")
")
")
")
 This exercise (and the ones to follow) introduces the concept of perspective and how different lenses, apertures, and angles of view change the appearance of a photograph.
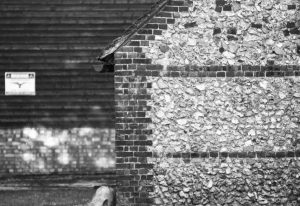
In this series of photographs I didn’t change my position and so changing the focal lengths only results in image cropping-each section of the boat coming closer but in a cropped view, till the final image which is almost abstract. The lens used was a zoom 70-200mm lens and a ‘telephoto lens will flatten perspective and appear to bring foreground and background closer together…very long focal-length lenses can produce apparent relationships between objects that are, in reality, quite far apart’ (David Praekel Basics Photography 01 Composition).
To demonstrate this, in the photograph to the right the shed and house wall look close together but there was about 30m distance between them.
Taking inspiration from the examples above or from your own research, create a final image for your sequence. In EYV the important thing is to present your work in context, so make it clear in your notes what you’ve been looking at and reading. The focus here is on imagination and research skills rather than the technical aspects of zoom.
For my final photograph, I have taken inspiration from Gianluca Cosci and his use of shallow depth of view to draw attention to the cable holding the boat on the beach. The cable is taught, thin but strong, dependable, resolute, and I saw this as a metaphor for the fishermen and their lives- looks tenuous but is strong – who fish and work out of Beer (a village in Devon) – and have done so for hundreds of years, passing from one generation to the next.

Exercise 2.2: Viewpoint
Does zooming in from a fixed viewpoint change the appearance of things? If you enlarge and compare individual elements within the first and last shots of the last exercise you can see that their ‘perspective geometry’ is exactly the same. To change the way things actually look, a change in focal length needs to be combined with a change in viewpoint.
Select your longest focal length and compose a portrait shot fairly tightly within the frame in front of a background with depth. Take one photograph. Then walk towards your subject while zooming out to your shortest focal length. Take care to frame the subject in precisely the same way in the viewfinder and take a second shot. Compare the two images and make notes in your learning log.
;
Although both look similar, there are differences; the shorter focal length at 75mm has introduced new elements into the scene as its angle of view is wider. I also used a wide aperture at f/5 thus blurring the background and bringing the subject into sharp relief. Depending on my intention, I might use a wider angle of view to introduce more context to the scene-in this case the huts in the background would indicate that it was shot on a beach or I might want to isolate the subject from the background and guide the viewer’s eye to the subject without any potential distractions.
Exercise 2.3: Focus
Find a location with good light for a portrait shot. Place your subject some distance in front of a simple background and select a wide aperture together with a moderately long focal length such as 100mm on a 35mm full-frame camera (about 65mm on a cropped-frame camera). Take a viewpoint about one and a half meters from your subject, allowing you to compose a headshot comfortably within the frame. Focus on the eyes and take the shot.

This photograph was shoot using a wide aperture resulting in very shallow depth of field. An aperture of 1.2 focused on the right eye meant the background and left eye are out of focus, while the right eye is is sharp releif. I placed the subject close to a window using the curtains to difuse the light.
Exercise 2.4: Woodpecker
Find a subject in front of a background with depth. Take a very close viewpoint and zoom in; you’ll need to be aware of the minimum focusing distance of your lens. Focus on the subject and take a single shot. Then, without changing the focal length or framing, set your focus to infinity and take a second shot.


This exercise highlighted some of the creative choices one has in making a photograph and the concept of ‘hyperfocal distance’-‘Hyperfocal distance, at its simplest, is the focusing distance that gives your photos the greatest depth of field. For example, consider a landscape where you want everything — foreground and background — to appear sharp. If you focus on the foreground, the background will appear blurry in the image. And if you focus on the background, the foreground will look out of focus! How do you fix this? Simple: you focus at a particular point between the foreground and the background, which makes both the foreground and the background elements of the scene appear reasonably sharp. This focusing point is called the hyperfocal distance.’ (Spencer Cox https://photographylife.com/landscapes/hyperfocal-distance-explained)
In this case, when I focused on the fence beams, my point of view was quite close and thus were in sharp relief while the background was blurred-this was because I used a large f3.2 aperture at 1/4000 sec at iso 500. When I shifted my focus to beyond the beams they became blurred and the rest of the scene came into focus.